DIY - SLIDING GATE TRACKS
Although there are quite a number of methods available to install sliding gate tracks it normally comes down to one of two options. Bolt down or concrete in.
Track basics.
Perhaps the two most basic fundamentals of planning a track for a sliding gate are straight and consistent. I say consistent because it is not necessary for a track to be level left to right, but it must be consistent. In other words, if your driveway has a consistent drop from one side to the other of say 200mm, then the run off portion of your track must also fall 200mm so that the entire track, which is twice the length of your gate opening falls a consistent 400mm. No rises and falls but a smooth, consistent drop.
Straight is pretty much common sense. The centre of your track should generally be about 100mm from your guiding post or pier for a 50mm thick gate. This dimension will vary dependent on your gate thickness roller configuration.
What type of track?
1. Bolt Down Track - This track assumes you have a surface suitable to bolt down to. Usually an existing concrete driveway or in some rare cases well secured and level brick paving will suffice if traffic flow is not heavy or constant. I know of professional installers who prefer to lay a full concrete plinth and then bolt down track. Their argument is that using bolt down track gives them flexibility and allows a section to be replaced if damaged. When bolted down to an existing driveway it is not unusual to see the back edge of the track or "run off" section with brackets or legs at 500mm intervals either bolted to an existing wall or concreted at footing points. This is acceptable in most cases as there will be no traffic over this section.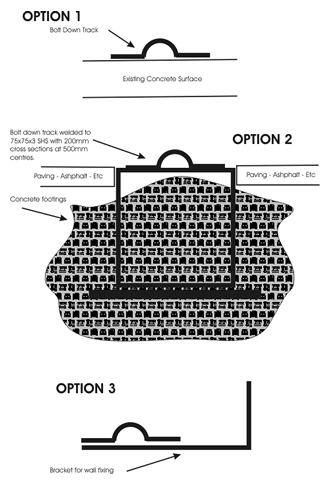
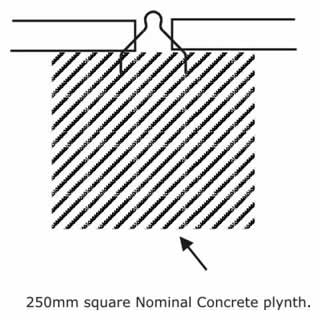
2. Concrete In Track - A full concrete plinth - typically 250mm x250mm x twice gate width long with concrete in track embedded. Reinforcement can be added if required. The concrete in track is designed to be simply pushed into the concrete and I find it easier to pour my plinth, get my basic levels, push my track in and finish off, many however prefer setting the track up with supports before the pour, pouring around the track and simply finishing off later. If ordering concrete you need to know how much and what type. The two mixes we use most commonly are known as 20/20/80 which is a standard footing mix and 25/10/80 which tends to be a little easier to finish but more costly. To calculate the amount multiply your plinth width by its depth by it's length in metres to give you a cubic capacity. Example - My plinth is .25 x .25 x 12 metres = .75 cubic metres. Now your local concrete company may have minimum quantities like 1 cubic metre but at least you know you have enough.
3. Full concrete plinth allowing for driveway completion. This is the most common type of track and is simply a concrete plinth poured to give allowance for driveway finishing, be it a brick paving header course or Ashphalt etc. A few different levels can be used to acheive different finished results (see below). This track has maximum strength due to the reinforcing and the run off area of the track is also well supported by the reinforcing.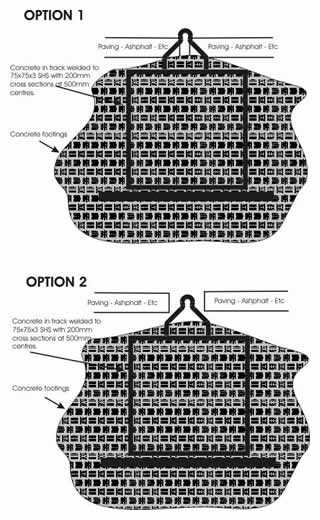
Perhaps the two most basic fundamentals of planning a track for a sliding gate are straight and consistent. I say consistent because it is not necessary for a track to be level left to right, but it must be consistent. In other words, if your driveway has a consistent drop from one side to the other of say 200mm, then the run off portion of your track must also fall 200mm so that the entire track, which is twice the length of your gate opening falls a consistent 400mm. No rises and falls but a smooth, consistent drop.
Straight is pretty much common sense. The centre of your track should generally be about 100mm from your guiding post or pier for a 50mm thick gate. This dimension will vary dependent on your gate thickness roller configuration.
What type of track?
1. Bolt Down Track - This track assumes you have a surface suitable to bolt down to. Usually an existing concrete driveway or in some rare cases well secured and level brick paving will suffice if traffic flow is not heavy or constant. I know of professional installers who prefer to lay a full concrete plinth and then bolt down track. Their argument is that using bolt down track gives them flexibility and allows a section to be replaced if damaged. When bolted down to an existing driveway it is not unusual to see the back edge of the track or "run off" section with brackets or legs at 500mm intervals either bolted to an existing wall or concreted at footing points. This is acceptable in most cases as there will be no traffic over this section.
2. Concrete In Track - A full concrete plinth - typically 250mm x250mm x twice gate width long with concrete in track embedded. Reinforcement can be added if required. The concrete in track is designed to be simply pushed into the concrete and I find it easier to pour my plinth, get my basic levels, push my track in and finish off, many however prefer setting the track up with supports before the pour, pouring around the track and simply finishing off later. If ordering concrete you need to know how much and what type. The two mixes we use most commonly are known as 20/20/80 which is a standard footing mix and 25/10/80 which tends to be a little easier to finish but more costly. To calculate the amount multiply your plinth width by its depth by it's length in metres to give you a cubic capacity. Example - My plinth is .25 x .25 x 12 metres = .75 cubic metres. Now your local concrete company may have minimum quantities like 1 cubic metre but at least you know you have enough.
3. Full concrete plinth allowing for driveway completion. This is the most common type of track and is simply a concrete plinth poured to give allowance for driveway finishing, be it a brick paving header course or Ashphalt etc. A few different levels can be used to acheive different finished results (see below). This track has maximum strength due to the reinforcing and the run off area of the track is also well supported by the reinforcing.